Getting Started
Installation
Download the add-on’s
.zipfile from your purchase platform (Gumroad, Blender Market, etc.).Open Blender and select Edit > Preferences.
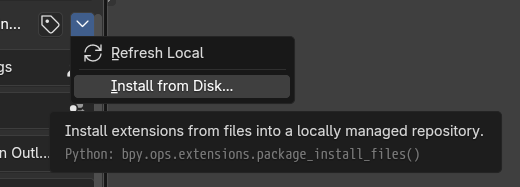
Go to the Add-ons tab, click the in the top right, then click Install from Disk….
Select the downloaded
.zipfile and click Install Add-on.
Download the add-on’s
.zipfile from your purchase platform (Gumroad, Blender Market, etc.).Open Blender and select Edit > Preferences.
Go to the Add-ons tab and click the Install… button.
Select the downloaded
.zipfile and click Install Add-on.
Quickstart
Once the add-on is enabled, the “Structured Renamer” panel will appear in the Tools tab of the 3D Viewport’s sidebar.
Note
Structured Renamer can rename selections from multiple editors. Use Target Area in the panel to choose where the selection is collected from:
3D View: Objects, Bones (Edit Bones / Pose Bones)
Outliner: Most Outliner-selectable data blocks
Node Editor: Nodes (renames the node
label)Sequence Editor: Sequence Strips
File Browser: Files (safe rename; folders are disabled by default, and extensions are preserved)
Basic Renaming Procedure
Select a Pattern: Choose the naming pattern you want to use from the Naming Patterns dropdown at the top of the panel.
Select Objects: Select one or more objects in the 3D viewport that you want to rename.
Apply Elements: The Name Elements section of the panel displays the elements of the selected pattern.
Click text element buttons (e.g., CTRL, Arm): Adds or replaces the element in the selected object’s name.
Click position element buttons (e.g., .L, .R): Applies identifiers for left/right, etc.
Click counter element buttons (e.g., 01): Adds sequential numbers. Click the last “…” to specify a number manually.
Click delete button (e.g., ): Removes the element from the name.
Example: Renaming “Bone” to “CTRL_Arm-01.L”
Select the
Boneobject.Select an appropriate pattern.
Click
CTRLandArmfrom the Text Element item buttons. (BecomesCTRL_Arm)Click
.Lfrom the Position Element item buttons. (BecomesCTRL_Arm.L)Click
01from the Counter Element item buttons. (BecomesCTRL_Arm-01.L)(Separators and order depend on the selected pattern settings)
Trying Other Presets
Once you’re familiar with the default patterns, try other presets. The add-on includes various presets for different purposes (rigging, characters, motion graphics, etc.).
Click the import button () in the Naming Patterns section at the top of the panel.
When the file browser opens, navigate to the
resources/presetsfolder in the add-on directory. (Usually opens automatically)Select and import preset files you want to try, such as
vrm.json,hardsurface.json,archviz.json, etc.The imported patterns will be added to the Naming Patterns dropdown.
For details: Import / Export
Editing Patterns
For more detailed settings or to create new patterns, click the Enter Edit Mode button at the top of the panel to switch to Edit Mode.
When editing is complete, use Exit Edit Mode to return to Renaming Mode.
More Information
For details about each UI element, see User Guide.
For concepts about naming patterns and elements, see Concepts.